Proto 2000 GP60
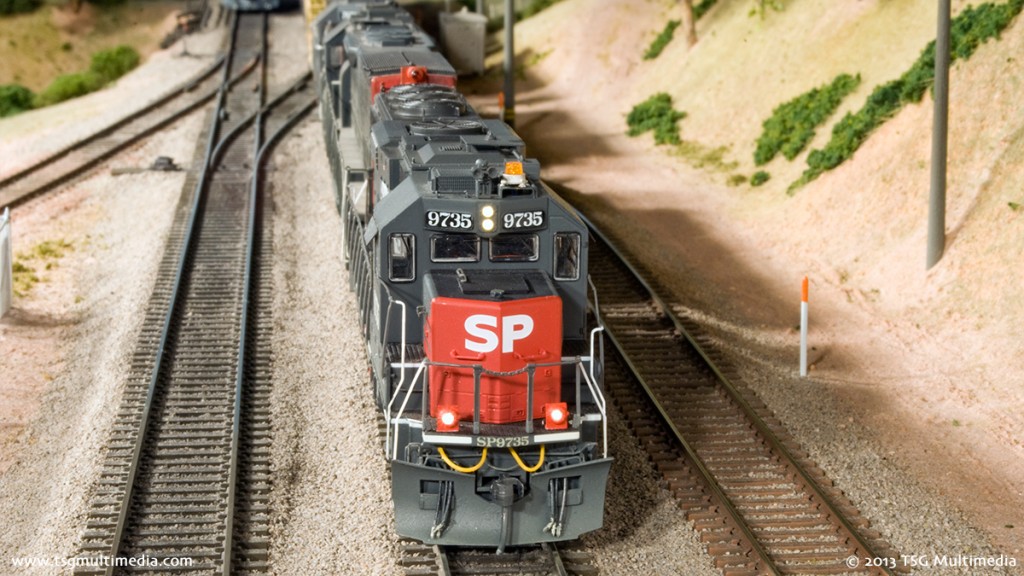
Proto 2000 GP60, Southern Pacific 9735
Overview
CV Programming – Digitrax DH165L0 and SFX004 SoundBug
Review
Update
As a modeler of the Southern Pacific in the early 1990s, I very much wanted to get my hands on one of the Proto 2000 GP60s in the speed lettering scheme. Unfortunately I missed them when they were released, but was able to pick one up secondhand at a good price. The biggest challenge when adding DCC and sound to a Proto 2000 locomotive is lack of space inside the shell, as much of the room is taken up by a heavy cast metal frame.
On the DVD I show how I installed the Digitrax DH165L0 and SoundBug combo, swapped the original bulb headlights for LEDs, and added working ditch lights and a beacon.
CV Programming – Digitrax DH165L0 and SFX004 SoundBug
Only common CVs or those that were changed from their default values are listed. Some settings reflect my personal preferences for speed matching and performance.
| CV | Value (decimal) | Notes |
| 2 (start speed) | 2 | This controls the minimum voltage applied to the motor at speed step 1. |
| 3 (acceleration) | 48 | This controls how quickly the locomotive changes speed when accelerating. |
| 4 (deceleration) | 39 | This controls how quickly the locomotive changes speed when decelerating. |
| 5 (top speed) | 73 | This controls the maximum voltage applied to the motor at full throttle. |
| 6 (mid speed) | 37 | This controls the voltage applied to the motor at half throttle. |
| 17 (extended address) | 230 | For locomotives with a 4-digit address, CV 17 and 18 together determine the address. To be honest I never try to set these manually. My Digitrax system does all this automatically for me when I program a 4-digit address. |
| 18 (extended address) | 7 | see CV17 |
| 29 (configuration) | 38 | The setting of CV29 is complex. See your decoder instructions. Your DCC system may set CV29 for you when programming your locomotive’s address. If you need to modify CV29, it’s best to do it after setting the address. |
| 51 (ditch lights) | 106 | Ditch light configuration for the F1 decoder output. |
| 52 (ditch lights) | 107 | Ditch light configuration for the F2 decoder output. |
| 55 (BEMF) | 255 | Digitrax calls this one “Static Compensation”. |
| 56 (BEMF) | 128 | Digitrax calls this one “Dynamic Compensation”. I left this one at the default. |
| 57 (BEMF) | 119 | This controls the BEMF intensity. 119 is 77 in hexadecimal, which for this variable means that the intensity in an advanced consist is 7 and the intensity for solo running is also 7. |
| 58 (volume) | 15 | This is the overall sound volume. |
| 60 (sound scheme) | 1 | 1 is the diesel sound scheme, including an air horn. 0 is steam. |
| 62 (ditch lights) | 0 | Ditch light flash rate. |
| 63 (ditch lights) | 50 | Ditch light holdover time (how long they flash after the F2 key is released). |
| 140 (volume) | 64 | This is the prime mover sound volume. |
| 141 (volume) | 20 | This is the bell sound volume. |
| 142 (volume) | 64 | This is the horn sound volume. |
Locomotive
This GP60 is a smooth and quiet runner. It’s also nice and heavy, weighing in at 19 ounces. The model captures the look of the prototype. I added a few details, including a Details West snowplow, ditch lights, and a beacon.
A word of caution, some Proto 2000s had the DCC socket wired improperly at the factory. This can cause the decoder to seem okay on the programming track, and even on a live track – until you advance the throttle. Then the decoder fries. Make sure to check the DCC socket before using a plug-in type decoder, or just remove it and wire the decoder yourself.
Decoder
The DH165L0 runs the locomotive well, giving good smooth overall performance. Having six function outputs is an advantage in a model like this with a lot of extra lights.
In the past some Digitrax decoders have exhibited a strange “speed jump” problem, where the rate of acceleration or deceleration would surge at a specific place on the DCC throttle when BEMF was enabled. Thankfully I haven’t been able to make this locomotive do this, so maybe Digitrax has fixed this issue.
The SoundBug is preloaded with generic diesel sounds (the instructions say it is from a SD38-2). If you’re one of those modelers who wants completely authentic sounds, this might disappoint you, though the decoder can be programmed with new sound sets.
After installing LED ditch lights in a couple of other locomotives and seeing how nice they looked, I decided to go back and redo 9735. I replaced the ditch light and beacon bulbs with tiny surface mount LEDs. The installation procedure is exactly the same as when using bulbs.
The LEDs I chose were tiny golden white surface mount LEDs with pre-soldered wire leads. When I say tiny, I mean tiny. They are smaller than the head of a pin! Nevertheless they are extremely bright. Using these allowed me to completely conceal the lights within a pair of Details West ditch light housings (I had originally used Detail Associates housings on this model).
The LED for the beacon also fit with just a little filing inside the cored-out amber dome supplied with the Details West beacon casting. The only caveat when installing these LEDs in metal castings is to be sure to put some insulation on the ends of the LEDs so that they will not short. I used liquid electrical tape, dabbed on with a piece of small wire as an applicator.
If you have some soldering skill, you can save quite a bit of money by purchasing surface-mount LEDs in bulk without leads and soldering your own. I do this now using 36-gauge magnet wire. The pre-soldered LEDs use similar wire. Either way, it’s very small and flexible. This wire is much easier to conceal than even 30 gauge conventional wire.
Once I had the locomotive back together the new lights were a definite improvement! I made some lenses for the ditch light housings using the fiber optic technique I discussed in the DCC Installs videos, just cutting the leads really short! The ditch lights look great and are much brighter than before. The beacon is also brighter, and now actually casts light on surrounding objects when flashing, which looks pretty cool.
The best thing about the ditch lights, though, is that there is nothing sticking out the back of the castings. The wires are sandwiched between the front and back halves of the Details West ditch light housing castings, and exit through the bottom. This allows the wires to be routed through the floor right under the castings, rather than out the back as is often the case with bulbs.
New Decoder
While I had the model apart I decided to swap the Digitrax electronics for an ESU LokSound Select decoder. The Select was not available yet when we were producing the DCC install videos. It is a six-function decoder with BEMF motor drive and sound, and sells for less money than the LokSound 3.5 that I used in several of the other installations on the videos.
Again, aside from the brand, the procedure for wiring up the decoder was exactly the same as on the video. They all have more or less the same wires coming out of them, after all.
The motor control of the LokSound Select is excellent as I’ve come to expect from LokSound. The sounds are first rate. The lighting effects, especially the beacon, are outstanding. The Select produces one of the most realistic beacon simulations I’ve ever seen.
Details
The Proto 2000 GP60s are pretty nice models to begin with, but while I had the thing apart I decided to remove the cast-on cab headlight in favor of a Detail Associates part with visors. These more closely match what was on the full-sized SP units. I also added a”Power by the Mile” sticker on the engineer’s side only, as per photos I found of the full-sized 9735 from the early to mid 1990s. The decal came from Microscale sheet 87-447. I also applied just a little more weathering using both an airbrush and powders.
Comments are closed.