Kato NW2
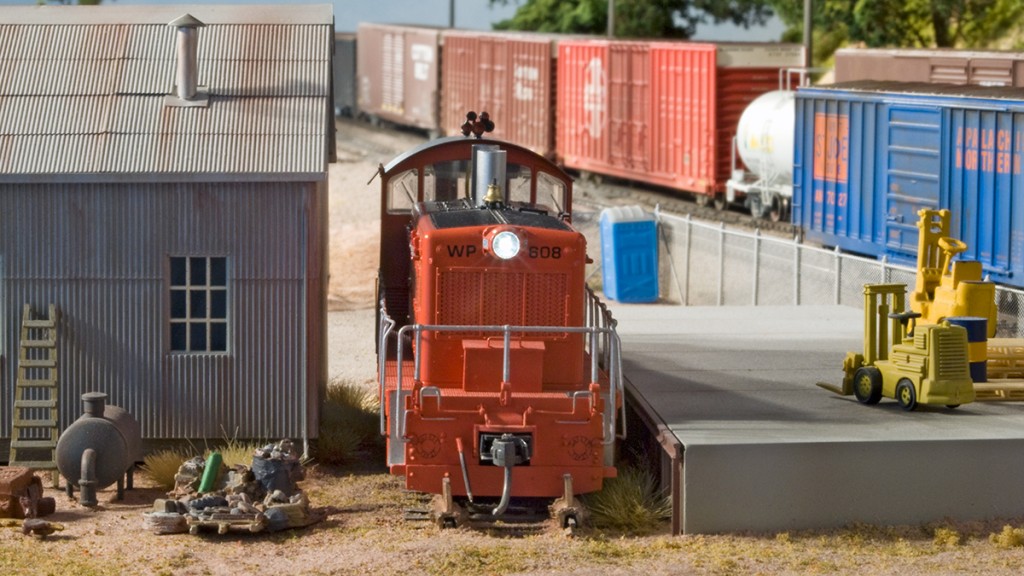
Kato NW2, Western Pacific 608
Overview
CV Programming – ESU LokSound 3.5
Construction
Review
I have had several opportunities to drive a locomotive at the Western Pacific Railroad Museum in Portola, California, but my very first time was back in 1995. I got to drive Western Pacific NW2 608, and I bought a custom painted Kato model of it on the same day in the gift shop.
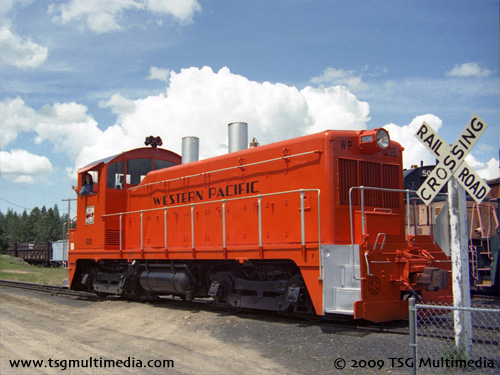
WP 608, Portola, California, 1995
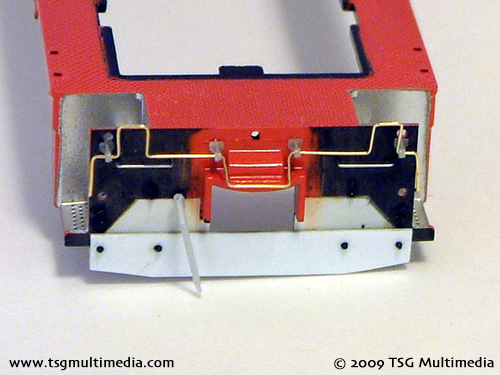
Years later, I contemplated how to install a decoder and sound in this sweet-running little switcher. I wanted to do it without using space inside the cab, because the interior of a switcher cab is very exposed and any electronics inside would be visible. I also wanted to preserve the open look of the switcher cab. This would prove to be quite a challenge, as there is next to no room inside these things, and they were not designed to be DCC ready.
On the DVD I show how I installed an ESU LokSound 3.5 sound decoder without taking up space inside the cab (except for a couple of wires). The stock headlights on this model were fairly dim, so I also show how I replaced them with newer, brighter LEDs.
CV Programming – ESU LokSound 3.5
Only common CVs or those that were changed from their default values are listed. Some settings reflect my personal preferences for speed matching and performance. The LokSound 3.5 has an outstanding BEMF implementation, and I left most of the BEMF-related CVs at their defaults.
| CV | Value (decimal) | Notes |
| 2 (start speed) | 0 | This controls the minimum voltage applied to the motor at speed step 1. |
| 3 (acceleration) | 30 | This controls how quickly the locomotive changes speed when accelerating. |
| 4 (deceleration) | 25 | This controls how quickly the locomotive changes speed when decelerating. |
| 5 (top speed) | 57 | This controls the maximum voltage applied to the motor at full throttle. |
| 6 (mid speed) | 29 | This controls the voltage applied to the motor at half throttle. |
| 17 (extended address) | 194 | For locomotives with a 4-digit address, CV 17 and 18 together determine the address. To be honest I never try to set these manually. My Digitrax system does all this automatically for me when I program a 4-digit address. |
| 18 (extended address) | 96 | see CV17 |
| 29 (configuration) | 38 | The setting of CV29 is complex. See your decoder instructions. Your DCC system may set CV29 for you when programming your locomotive’s address. If you need to modify CV29, it’s best to do it after setting the address. |
| 53 (control reference) | 32 | Reducing this value from the default has the effect of lowering the starting speed of the locomotive (though it is still good with the default value). LokSound decoders are great at low speed crawling, making for amazingly smooth starts and stops. |
| 63 (volume) | 42 | This is the overall sound volume. |
| 114 (backup light) | 2 | This has the effect of dimming the backup light. After the install I discovered that for some reason the rear headlight LED was much brighter than the front headlight, almost too bright to look at! Since I didn’t want to take the locomotive apart to put in a bigger resistor, I took advantage of the LokSound’s ability to reduce the voltage to a function output by setting this CV. Now both headlights are about the same intensity. |
| 121 (volume) | 64 | This is the horn sound volume. |
| 122 (volume) | 12 | This is the bell sound volume. |
| 123 (volume) | 20 | This is the auxiliary sound volume (prime mover, brake squeal, and everything else). |
| 172 (F5 button forward B) | 1 | Setting this variable to 1 prevents the locomotive from slowing down when dynamic brakes are turned on with the F5 button. |
| 175 (F5 button reverse B) | 1 | see CV172 |
WP 608 has some details that differ from the stock Kato NW2. Since this model was pre-painted, I didn’t want to have to strip it and start over, but I did want to make some corrections to make it a more accurate model.
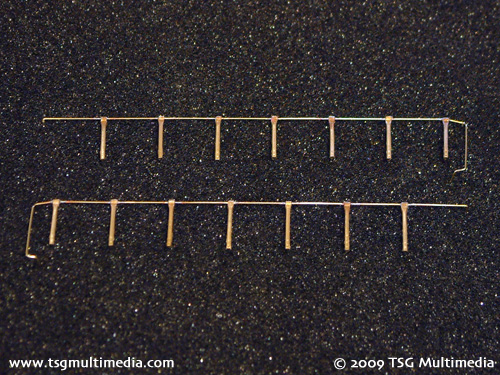
Kato NW2 Handrails
For starters, WP 608 has handrails running the entire length of the hood. I made my own using Precision Scale brass stanchions and Detail Associates .015 brass wire. I like using all brass because I can solder the stanchions to the wire, making for a very solid handrail assembly. Brass also takes paint pretty well. I drilled holes along the sill to accommodate the stanchions, then painted the handrails prior to installation.
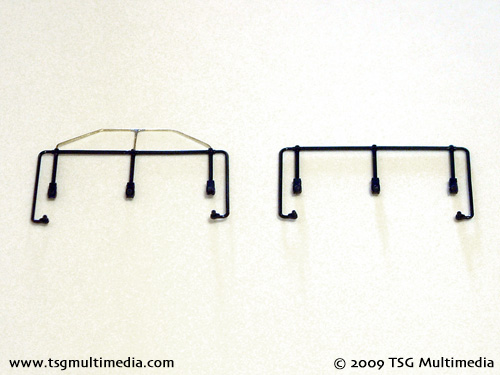
Kato NW2 End Handrails
The end railings are also a little different than stock. After careful study I realized that the lower cross bars were not present on the prototype, so I cut these off. The rear end rail also has a vertical extension which I fashioned out of brass and inserted into holes drilled into the top of the Kato plastic railing. The actual railings on the Kato pieces are a little thick, but I decided that I could live with that on this model.
Kato NW2 Bin
I scratch-built a box to match the one below the radiator on the prototype using Evergreen styrene and some brass wire for the grab iron.
Kato NW2 Pilot
Like a lot of models of older diesels, the Kato NW2 comes with footboards. Since WP 608 didn’t have those when I drove it, I removed them.
The stock Kato NW2’s pilots have recessed areas near the bottom that are not present on WP 608. I filled these with .010 Evergreen styrene and some green putty. Once dried and sanded, I added some nut-bolt-washer castings, a train air line, and custom made uncoupling levers. I masked the sills, primed the entire pilot face, and then sprayed on some orange that I mixed myself. I got a pretty good match to the factory paint, and the slight discrepancy in color was not that noticeable once the model was reassembled and lightly weathered. I painted the box at the same time. The factory paint did not have any black on the top of the hood, which the prototype locomotive does, so I masked that and painted it at the same time.
I made WP 608’s oversized exhaust stacks from some pieces of K & S aluminum tube, which I simply fit over the plastic Kato exhaust stacks. I painted these silver just like on the full-sized locomotive.
Other details include an A-line brass sunshade on the engineer’s side only, and some Microscale decals for the “WP 608” end lettering, the small numbers on the sides of the headlight housings and the “Safety First” circles on the pilots.
Locomotive
The Kato NW2 is an excellent runner, especially at low speeds, perfect for a switcher. Back when I was still running DC I added some extra electrical contacts to the wheels and replaced the Kato copper contact strips that pick up power from the trucks with soldered wires. This reduced stalling problems due to poor contact. I kept those modifications when I converted the locomotive to DCC. This model is a little gem, definitely high on my list of favorites.
Decoder
The LokSound 3.5 delivers outstanding performance and solid sound. I especially like the fact that the LokSounds don’t generally require much if any CV tweaking to achieve stellar performance. I have tried many brands of decoders and I have yet to find anything that will make a locomotive run better than a LokSound.
The sound quality of the LokSound 3.5 is largely dependent on the sound set that’s programmed into the decoder's memory. The EMD sounds are generally very good, especially at idle. I used a LokSound with a 5-chime horn to match the prototype, and it sounds good!
The LokSound 3.5 has the ability to load different or customized sound sets if you have a PC and the ESU LokSound Programmer hardware/software package. Thankfully, though, all of the features of the decoder aside from loading new sounds are accessible via CV programming.
Comments are closed.